Advanced Network Design and Implementation
Introduction
In the 21st century, network systems and administration is becoming more dominant in a sphere where information technology seems to be gaining more recognition as time goes by. Network and system administration is regarded as a branch of engineering more concerned with operational management of the significant human-computer systems. At some point, it is seen as unusual for the engineering discipline to hand issues to do with computer systems as well as users of a given technology. However, the discipline gains more sense when the idea of putting network of computers together and making then run as well as keeping them run regardless of the activities handled by users. This is also the same subject when attracting the understanding of the system, as well as the networking concepts which constitute the technologies, principles and the emerging trends. Based on this background, the paper indulges in showcasing the design, implementation as well as configuration of the advanced network systems. This applies to a company that desires to deploy the LDAP infrastructure based on the Linux systems. Significant tasks include installation and configuration of the LDAP on a Linux server, creation of the infrastructure, installation and configuration of the Linux client who is supposed to a member of the domain, and deployment of the required services as required for the operation of LDAP.
First, it was more appropriate to assemble the tools required for this assignment. The virtual machine was needed as well as Ubuntu which supports the Linux server. Only Virtual Machine workstation pro 15 and Ubuntu 18.04 LTS could be acquired from the online platforms. Virtual machine could appropriately work on Windows 10. Secondly, it was necessary to install and configure the LDAP, which supports the intended infrastructure. LDAP, which stands for Lightweight Directory Access Protocol, is regarded as a standard protocol which is designed to manage as well as access hierarchical directory details over a given network. The first step is to install the LDAP server as well as the associated utilities. This is easier when the significant packages are accessible through the default repositories supported by Ubuntu.

As indicated in figure 1, there was needed to refresh the local package index before installing the required packages. Sudo command was of use with apt-get. Therefore, the command
$ sudo apt-get update
was used to get the local package index while installing the necessary packages for the exercise. Over the installation process, one was required to select the administrator password and confirm it for LDAP. However, one is allowed to pick on anything or use the password to introduce Ubuntu to the virtual machine. Commonly, the slapd package has the capacity to introduce configuration questions over the installation process. Such prompts can be accessed to by asking the system to reconfigure the package $ sudo dpkg-reconfigure slapd.


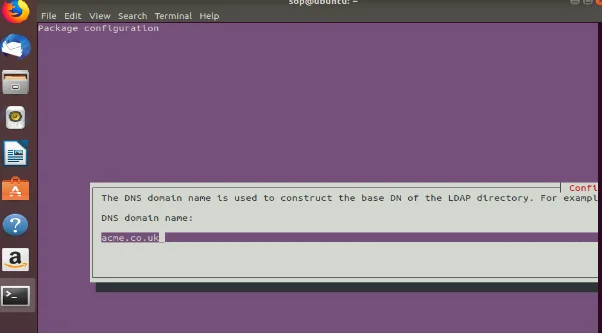
After reconfiguration of the package, the system asks for the organizational name. Figure 2 indicates that the organizational name was acme, which doubles as the domain name introduced in the directory path. Perhaps, other questions that are likely to pop up include the database backend, movement of the old database and giving room for the LDAPv2 protocol, which should be disallowed. After this stage, the LDAP server was running and configured. While testing the LDAP connection, it ought to have returned the username with an anonymous output. The subsequent stage, requires one to install as well as configure phpLDAPadmin web interface, which is commonly easier for most of the users.

Figure 3 shows installation of the phpLDAPadmin. Most of the Ubuntu repositories carry with them the phpLDAPadmin package. The command line $sudo apt-get install phpldapadmin was used to install the application while enabling the significant Apache configurations. While the web server is configured, more changes need to be done for the purposes of avoiding auto-filling and configuration of the phpLDAPadmin to the main domain.
Dig deeper into anonymity in wireless network with our selection of articles.

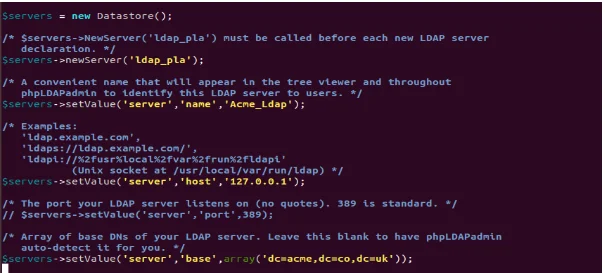
Figure 4 shows configuration of the phpLDAPadmin to the require domain. This could first be made possible through opening the configuration file that has the root privileges. One would search for the line reading $ servers->setValue (‘server’, ‘name’) as shown in figure 4 before introducing the new server and setting the new host. The line gives the name for the LDAP server. After this, it was necessary to move down to $servers->setValue line. The server name could be switched to “Acme_LDAP” and the new server denoted as “ldap_pla”. The server host is set to 127.0.0.1. Subsequently, the base value could be required to reconfigure the slapd package. The acme.co.uk could essentially be translated easily into the LDAP syntax by introducing each of the domain components. This could be reflected in an array (dc=acme, dc=co, dc=uk) as seen in the last line of Figure 4. Perhaps, the option is known for pre-populating the login details for the admin in the web interface. At this stage, the process prompts controls that would influence the visibility of some of the messages.
Looking for further insights on User Anonymity in Wireless Network? Click here.

Figure 5 shows some of the messages regarding the template files. This is mainly linked to the authentication process and possible messages that can popup. At this point, there is need to find what is referred to as the login bind_id configuration line before commenting out using the (#) sign at the start of the line. This could be done as shown below
#servers->setValue (‘login’, ‘bind_id’, cn-admin, dc-acme, dc=co, dc=uk)
The line above is what prepopulates login details for the admin. Because the page can publicly be accessed, it was good to for the
#servers->setValue(‘login’, ‘bind_pass, ’secret’)
This is the last stage that needs to be adjusted before saving and closing the file. Nothing needs to restart for the changes to start taking shape in the server. One can now login into the webpage and see what is known as the log in console as shown in figure 6.
Take a deeper dive into Server Computer Configuration Essentials with our additional resources.

The landing page for the phpLDAPadmin shall be loaded before clicking on the login link. In most cases, a Login DN pops up, which compels one to introduce a username, which is also the account name. The admin account is by default the one that is displayed while logging into the system. The Authenticate button gives one access to the system thereby giving him or her powers to add users, relationships, groups and even organizational units. However, this is largely determined with the way one assigns the privileges.

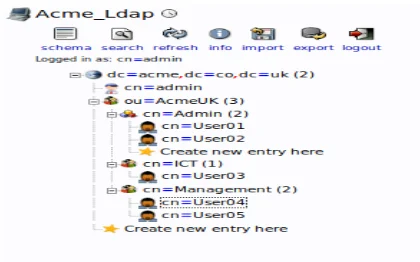
Figure 7 shows the ‘create object’ option which allows one to create categories. In this case, the system is more focused on organizational units, users and admins among other groups. The organizational unit comes first, which is demoted as AcmeUK as shown in Figure 7. Due to the fact that the organizational structure is being used in this case, it is more appropriate to make use of the template denoted as Generic: Organizational Unit.

The process in figure 7 is repeated in figure 8 to crate slots for admin, groups and users and any new entry that can be introduced by the developer. As shown in Figure 8, the template Generic: Posix Group could be applied in assigning the GID number.

The process in figure 8 assigns more privileges to the admin, who is in charge of the user 01 and user 02 as shown in figure 9.

Figure 10 shows that it is possible to create groups and users in the systems. While creating groups, one is allowed to click on the category indicated as groups. One can see an overview of the significant entries under ‘organizational unit=groups’, which is simply denoted as ‘ou-groups’. Almost similar process applies to creating users. This begins from clicking on the “ou-users” before creating an entry. Perhaps, one would go for “Generic: User Account” for the subsequent entries.

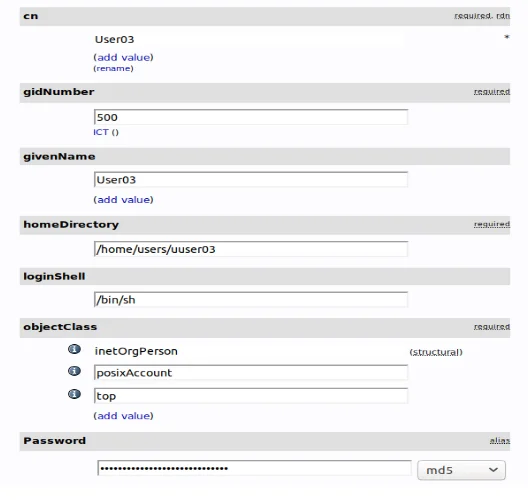
It is always important that one should keep a common name. However, when it comes to User 3, which also denotes the ICT person, then the cn=user portion is necessary. If the user is no longer common, then one is allowed to add several users to the group. The “Add new attribute” option applies to denote additional persons into the system.


The procedure in Figure 11 also applies to Figure 12 where the attribute is assigned to the management.

Figure 13 shows a directory which is accessible as read-only by users. An additional root to the server ensures that this option is available.

Figure 14 shows that users can access a document denoted as HRdoc whoch is dummy.

An additional root denoted as root@ubuntu:/var/policies# denotes the Policies directory, which has only a Read-only access to the Admin group members. It should be noted that the LDAP server gives room for expansion of information as well as addition of more organizational structures.
- 24/7 Customer Support
- 100% Customer Satisfaction
- No Privacy Violation
- Quick Services
- Subject Experts


